Fading Echo Elemental Forms Guide — Water, Lava, Toxic Waste & Paradox
A field guide to the four elemental forms in Fading Echo and how they interact. What each form actually does in traversal, combat, and puzzles; the element-counter interaction matrix (lava enemies solidify in water, water enemies are weakened by toxic, most enemies burn in lava, Paradox makes enemies explode on death); the mixing rules that produce a radiated lava form; and the trail-and-anchor habits that tie the kit together.
The Four Forms and What Each One Does
The four forms are Water, Lava, Toxic Waste, and Paradox. Each one shows up in all three contexts below — traversal, combat, and puzzles — but they are not equal across the three. Water is the only form that covers all three roles cleanly, which is why it is treated as the home form the rest of the kit filters back to. The other three split their coverage and are best used as tools you dip into rather than forms you stay in.
The table below is the page that ties the rest of the guide together. Read the traversal column for movement, the combat column for what each form does against an enemy, and the puzzle column for the role each form plays in routing a room.
| Form | Role | Traversal | Combat | Puzzle |
|---|---|---|---|---|
| Water | Base / home form — One always returns here. | Slip through cracks, grates, and pipes. Dive-splash attacks deal more damage the higher the drop. | Freezes and solidifies enemies on hit. A charged ranged wave (tsunami) upgrade extends the reach. | Required for carrying Æther Cores to devices and sockets. Held Element Cores swap One into the matching form on demand. |
| Lava | Hazard form — One cannot be controlled directly inside it. | Contact turns One into vapor / steam form for long glides between platforms. Direct control is unavailable while inside. | Burns most enemies on contact. Lava-coated enemies pushed into water solidify and become much weaker. | No direct puzzle role; mostly a hazard to route around, a trigger for form-swap chains, or a fuel for mixing with toxic waste. |
| Toxic Waste | Transformable combat / movement element. | Expel it on demand to launch One into an explosive high jump that crosses wide vertical gaps. | Weakens enemies so they take more damage and have their attacks interrupted. Water-coated enemies are especially vulnerable to it. | No standalone puzzle role, but pairing it with lava produces a radiated form that climbs and glides in a single motion. |
| Paradox | Puzzle / detonation element. | Not a primary movement tool; mostly used as a tactical anchor through the warp point it sets. | Marks enemies as unstable so they explode on death — strongest on clustered packs. | Sets a warp point you can teleport back to within tether range. Key for routing dimension swaps and retrying tricky platforming chains. |
Tip
Lava is the one form you cannot control directly. Use it as a transition state — dip into a lava pool to trigger the steam glide, then drop back to water the moment you commit to a fight. Staying in lava is a positioning mistake, not a stance.
Element-Counter Interaction Matrix
The interaction matrix is the rule sheet for combat. Identify the enemy coating (or the floor pattern), apply the matching form, then close with a kick into a hazard or off a ledge. Lava enemies solidify in water; water enemies are weakened by toxic waste; most enemies burn in lava; Paradox marks enemies to explode on death.
The matrix below turns those rules into a quick lookup. The kick is the bridge between reading a coating and applying the counter — it is the move that actually moves an enemy into the exact pool you need.
| Enemy or situation | Best counter | Follow-up |
|---|---|---|
| Lava-coated enemies | Water — freezing hit breaks the coating and solidifies the target. | Once frozen, a kick into the nearest hazard or off a ledge finishes the job cleanly. |
| Water-coated enemies | Toxic Waste — applies a weaken effect and interrupts attacks. | Keep up the kicks while the weaken window is up; water enemies are especially vulnerable to toxic. |
| Most standard enemies | Lava — direct burn damage with no setup required. | Standing in lava harms One as well, so dip into it briefly to trigger the form, not as a permanent footing. |
| Enemies fused with any element | Identify the coating first, then apply the matching counter (lava foes into water, toxic foes into fire, and so on). | Kicks are the tool that actually moves an enemy into the exact pool you need. |
| Clustered packs | Paradox — marked enemies explode on death and clear neighbors. | Drop a Paradox anchor at the room entrance so a failed pack clear is one teleport away from a retry. |
| Mixed-element floors | Read the floor the same way you read an enemy coating — step around lava, toxic, and Paradox marks. | One is affected by her own elements on the ground. The defensive habit is treating the floor as a hazard list. |
Mixing Rules: Two Forms in One Motion
The four forms are not siloed. Dipping from one form into another produces a short-lived combined state that does more than either form does on its own. The strongest verified chain is lava followed immediately by toxic waste, which produces a radiated lava form that combines a high launch with a steam glide in a single motion — the cleanest way to clear a wide horizontal gap.
The mixing table below lists the chains that ship in the game. Read it once, then re-read it any time a traversal puzzle feels one step too far for a single form.
| Chain | Result | Best for |
|---|---|---|
| Lava, then Toxic Waste | Radiated lava form — combines a high launch (from toxic) with a steam glide (from lava) in one motion. | Wide horizontal gaps where a single dip-and-leap needs to cover both the climb and the glide on the other side. |
| Water, then Lava | A short vapor / steam form as One passes through the lava boundary. | Gliding between platforms after a low lava dip. Cannot be held inside the lava itself. |
| Paradox, then anything | Paradox warp point persists while you dip into another element, then you can teleport back within tether range. | Saving the run before a hard platforming chain or a packed arena you do not want to re-walk. |
| Any element, then re-dip through your own trail | Element trails you leave behind persist for a short window, enabling quick re-dips without trekking back to the original pool. | Long corridors where the nearest lava or water pool is far away and you need the same form again seconds later. |
Tip
Mixing is order-sensitive. Lava, then toxic, produces the radiated lava form with the combined launch + glide. Toxic, then lava, does not produce the same chain — always lead with the lava dip when you want the combined motion.
Form-by-Form Tactics That Come Up in Every Fight
One habit for each form covers most of the situations you will meet. The list below is short on purpose — the counter table is where you go for the rules, this list is where you go for the rhythm.
- Water. Use it as the form you fight and traverse in by default, switch into the others only when a coating demands it.
- Lava. Dip into lava for the long steam glide between platforms, then drop back to water before committing to combat.
- Toxic Waste. Expel the toxic for an explosive high jump across vertical gaps, and use it to weaken water-coated enemies mid-fight.
- Paradox. Drop a Paradox warp point at the start of any hard sequence, and tag clustered packs so the marked kills explode on death.
- Element trails. When you dip into an element and leave a pool behind, the trail persists for a short window. Re-dip through the trail instead of trekking back to the original pool — this is how long corridors stay short.
- Element Cores on demand. Pick up an Element Core and you can switch into the matching form without hunting for a pool. Carry only what the next room needs, and remember gratings drop carried items — plan the swap before you pick the Core up.
- Read the floor. Lava, toxic, and Paradox marks are hazards for One just as much as for enemies. Treat the floor as a hazard list, dip in only briefly to trigger a form, and never treat a lava pool as a permanent footing.
Element Counter Coverage Across the Six Enemy Patterns
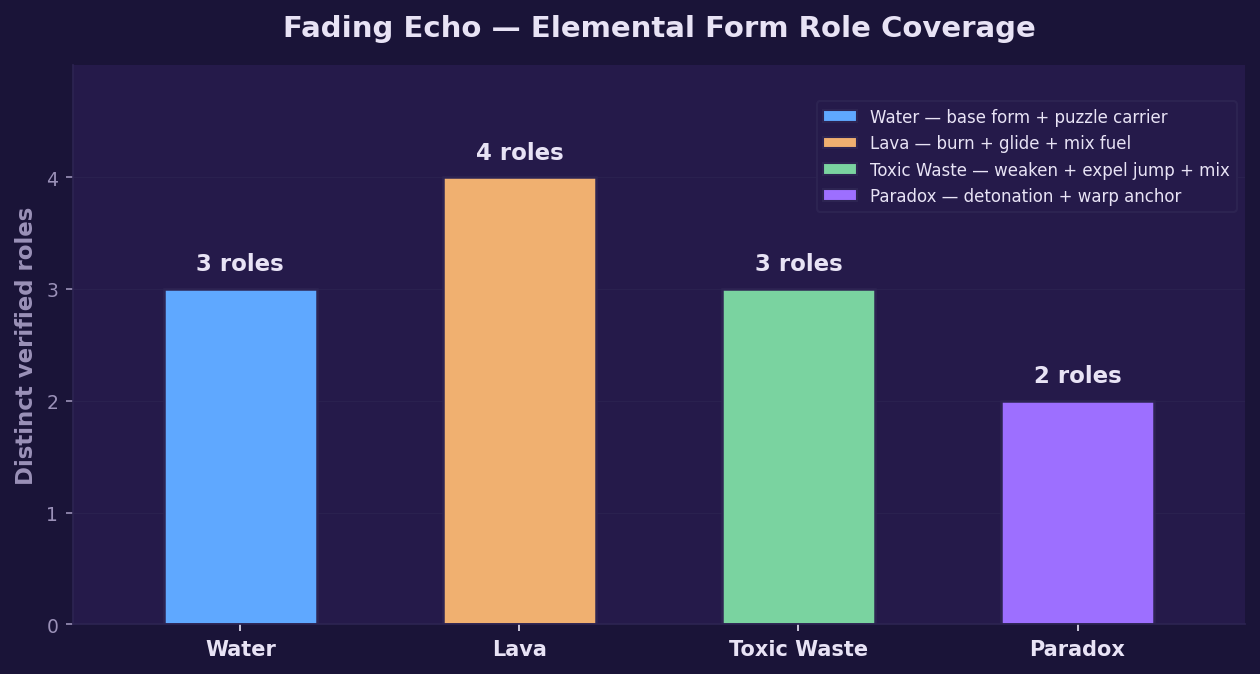
A look at how the four forms distribute across the six enemy / situation patterns in the counter matrix above. Each bar is the count of distinct patterns that the matching form verifiably counters well — for example, Water is the clean counter for lava-coated enemies and the carrier for Æther Cores in puzzle rooms, while Paradox anchors the cluster-clear and warp-anchor patterns.
Frequently Asked Questions
Short answers to the most common questions about the four elemental forms and how they interact in Fading Echo.
1What are the four elemental forms in Fading Echo?+
The four forms are Water, Lava, Toxic Waste, and Paradox. Water is the base form One always returns to and the only form that carries Æther Cores. Lava is a hazard form that turns One into steam for long glides. Toxic Waste is transformable on demand for both a weaken effect in combat and an explosive high jump. Paradox is mostly a puzzle / anchor element that marks enemies to explode on death and sets a warp point you can teleport back to within tether range.
2How do element counters work in Fading Echo?+
Enemies come coated in an element, and the coating decides which form you should switch into before you commit. Lava-coated enemies are frozen and solidified when hit with water. Water-coated enemies are weakened and have their attacks interrupted by toxic waste. Most standard enemies burn in lava and take heavy damage from a tall dive-splash. Paradox marks enemies so they detonate on death, which shines against clustered packs. The kick is the tool that actually moves an enemy into the exact pool you need.
3What does mixing lava and toxic waste do?+
Dipping into lava and then immediately into toxic waste produces a radiated lava form that combines a high launch with a steam glide in a single motion. It is the cleanest way to clear a wide horizontal gap with one dip-and-leap. You can also chain water into lava for a brief vapor glide, and Paradox into anything else while the warp point persists.
4Can One be hurt by her own elements?+
Yes. One takes damage from lava, toxic waste, and Paradox marks on the ground. The defensive habit that pays off across the whole game is treating the floor as a hazard list — step around the patches, dip in only briefly to switch forms, and never treat a lava pool as a permanent footing.
5How do element trails and Element Cores help?+
When you dip into an element and leave a pool behind, the trail persists for a short window so you can re-dip through the same trail without trekking back to the original pool. Element Cores go further — pick one up and you can switch into the matching form on demand without hunting for a pool at all, which matters in arenas without visible water or lava and in puzzle rooms where the next switch is several jumps away.
Related Guides
Pair this forms guide with the first-hours orientation, the launch tips, the launch-day summary, and the site info pages to round out a session in Fading Echo.
Beginner Guide
A first-hours orientation covering the four elements, the kick-driven combat loop, the Bastion hub, the three Shadows, and the early mistakes worth sidestepping.
Advanced PlayTips & Tricks
Combat tactics, the kick-into-hazard habit, element counter quick-reference, movement chains for big gaps, and where launch players tend to stall.
Critical ReadReview & Critical Consensus
The launch-window Metascore, the outlet-by-outlet scores, the Steam user rating, and the consensus on what the elemental combat gets right and where it stumbles.
HardwareSystem Requirements
The minimum and recommended PC specs, plus what to expect from a Steam Deck session versus a modest gaming laptop or desktop.
Quick AnswersFrequently Asked Questions
A short FAQ covering platform support, the demo, the launch discount, the DLC add-ons, and the core gameplay loop in one place.
AboutAbout This Guide
Who maintains the guide, how recommendations are tested, and the editorial standard for what ships on launch day versus what waits.